Share: #GenesisWP – Adding Font Awesome Icons to Your WordPress Menu
In this tutorial we are covering, How to add Font Awesome to your WordPress menu using the Genesis Framework without a plugin. This is the manual way of doing this and does require a little knowledge of how to copy and paste code. If you have any questions just ask!
Enqueuing Font Awesome into your theme
- Add this Genesis Snippet into your functions.php file and save (typically I group it together with all the other enqueued scripts to make it easier to find later)
https://gist.github.com/JohnBunka/28f51a9d19659decf41e
Add Font Awesome Icons to Your WordPress Menu
1. Login to WordPress
2. Click Menu and Add a menu item
3. Click Screen options and turn on Link Target
![]()
4. Find the icon you want to use at http://fortawesome.github.io/Font-Awesome/icons/ and click the icon to show the code. Example:
<i class="fa fa-instagram"></i>![]()
5. Paste the code into the “Navigation Label” and click “Open link in a new window/tab”
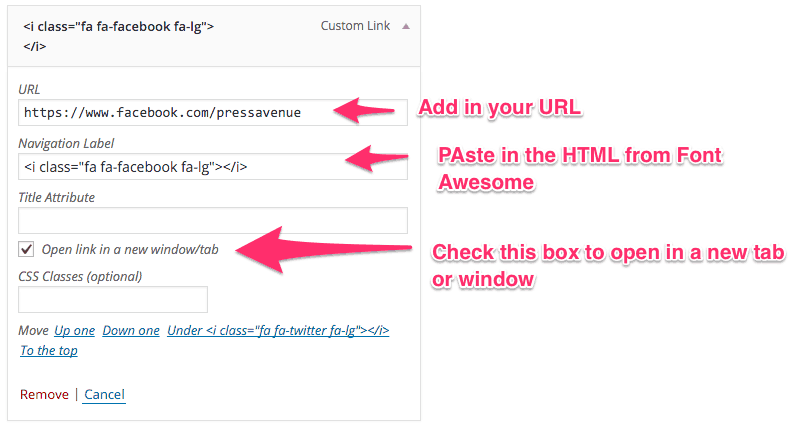
6. Save and refresh and you should see the icon in the menu
Let us know if you’re using this in the comments below.
Posted in Code Snippet, Genesis, WordPress YouTube Tutorial Tags:
Let us know what you think of the #GenesisWP – Adding Font Awesome Icons to Your WordPress Menu WordPress Tutorial. Feel free to ask a question or give your two-cents. Additionally, you can continue the discussion on our Free Facebook Group: "WordPress Tutorials & Community Help"